 New Energy Technology Co.,Ltd")

nyebanner
Installation Guide
Preparations before cable installation
Installation tool preparation:
|
1) Electric hand drill: Drilling holes for the bracket, drilling and riveting at the joints of the South air duct and the iron air duct 2) Impact drill: Drill holes in the wall and use expansion bolts to fix the bracket to the wall 3) Power wiring board: convenient power tools for long-distance construction 4) Bolt pliers: cut off the main steel wire of the suspension (usually the main steel wire of the suspension is not easy to be cut by tools such as pliers) 5) Hammer: fixed bracket |
6) Pliers: Pull the main steel wire and put on the chuck 7) Wrench: fix the bracket, tighten the chuck 8) Wire take-up: tighten the steel rope 9) Tape measure: measuring size, positioning 10) Marker pen: position mark, write data |
11) Seat belt: safety guarantee for working at heights 12) Manual riveting gun: used for connecting the Soss system with the metal mouth 13) Scaffolding: used for high-altitude operations. Electric lifts were also used to replace portal scaffolding during construction 14) Laser level (sliding rail installation) |
Steel cable installation steps
A: Make the bracket, make the required bracket according to the site situation and the specific location of the installation
B: The bracket is positioned and installed, and the spacing and height of the steel cables of the system are determined according to the upper and lower heights and diameters of the air outlets of each iron sheet air duct. Determining the bracket spacing requires that the front and rear brackets of the same air duct system be installed in parallel, symmetrically, and without offset
C: For the installation of the steel wire rope, measure 1.2 times the length of the wire rope of the drawing size and cut the wire rope
D: Make the rope head and tighten the steel cable. After the steel cable rope head is made, hang it on the ring, and use a cable tensioner to tighten the steel cable on the other side. After the steel cable is tightened, make the other side of the rope and hang it on the ring. , tighten the turnbuckle bolts, loosen the cable tensioner

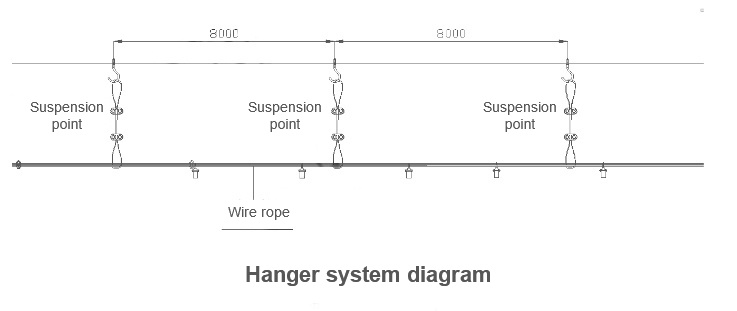
E: Fabrication and installation of the middle suspension point, determination of the number of suspension points and installation positioning: 2mm steel rope is used to make the hanger. The hanger can calculate a suspension point according to about 8m. The fixed point on the top plate should be on the same vertical plane as the steel rope.
F: Inlet installation, the inlet of the cloth air duct is set on the metal air duct, and the position of the air duct is adjusted, with the zipper facing upward. If you encounter an air duct system with a tee or an elbow, install the tee or elbow first, install the air ducts on both sides of the tee or elbow in sequence according to the drawing, and adjust the length of the air duct according to the actual position to ensure that the length of the air duct is appropriate .
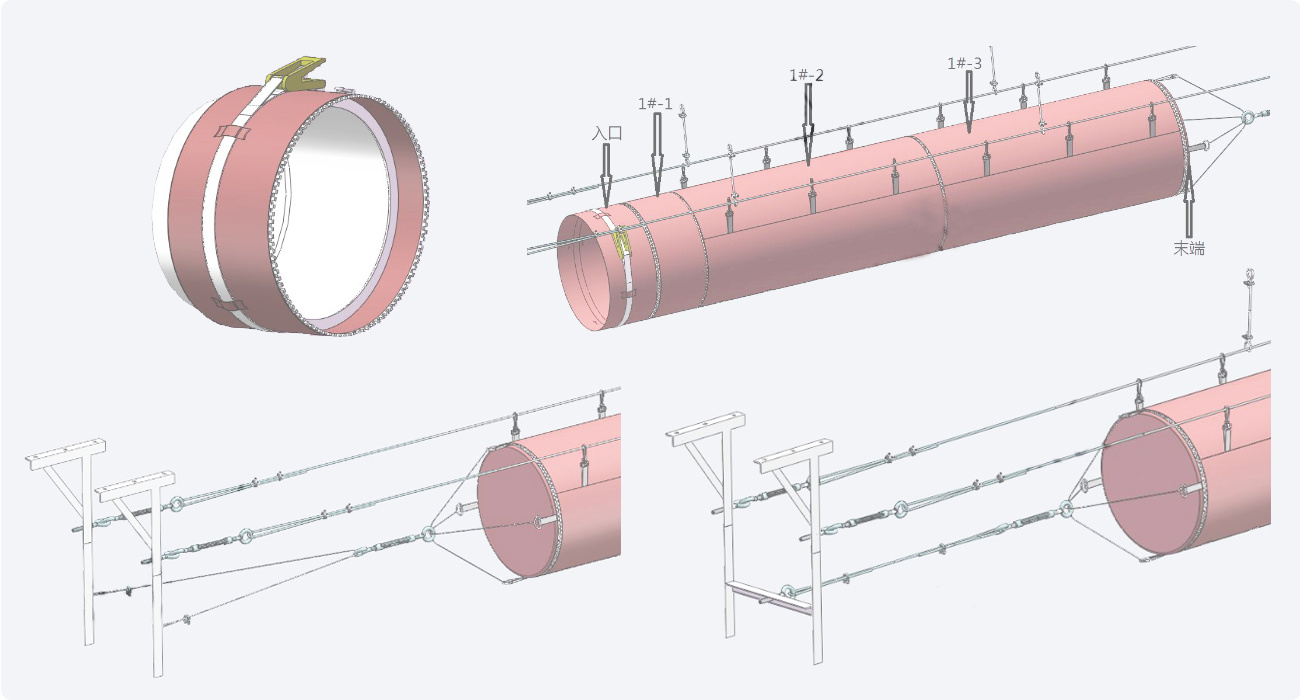
G: Install the air duct, and connect each section of the air duct corresponding to the number of the air duct on the installation drawing. The drawing numbering principle is 1# entrance, 1#-1, 1#-2, 1#-3...1# end, generally a section of 10 meters, and so on according to the length, and finally install the end; when installing Check whether the pipe segment number is correct, straighten the air pipe, and tighten the D-shaped buckle at the end of the air pipe with a wire rope. Wear gloves when hanging the pipe and keep the air pipe in the main material box at all times to avoid dirty air pipe.
H: Ventilation adjustment, open the zipper at the entrance before starting the machine to blow out the dirt in the original air conditioning system, close the zipper between the entrance and the air duct when the machine is turned off, and start the operation (start at different speeds to gradually increase the air pressure, so as not to tear the end with too much pressure).

© 2022 All Rights Reserved Well Air Conditioning(Guangdong) New Energy Technology Co.,Ltd 粤ICP备19137042号 SEO Powered by www.300.cn